💧 Wet Microbe Recovery GuideUpdated 3 days ago
◻Overview
Wet or clumpy microbes are not dead — in most cases, full recovery is possible by following the steps below.
The only exception is fully liquified microbes, which cannot be restored and must be replaced with a new Compost Starter. For all other cases, recovery time depends on severity — see the table below.
◻ Can Wet Microbes Be Saved?
State | Recovery Possible? |
Slightly clumped but still soil-like | ✅ Yes — typically resolves within 5–7 days |
Wet and clumping (muddy) | ✅ Yes — allow 1–2 weeks for recovery |
Severely wet — liquid pooling on surface(but not fully liquified) | ⚠️ Possible but requires 2+ weeks of active care |
Fully liquified | ❌ Not recoverable. Remove all microbes and replace with a new Compost Starter pack. |
💡 Wet or clumpy microbes are NOT dead. Microbes are resilient and can recover from most moisture issues. Full liquification is the only state that is unrecoverable. |
◻Recovery Steps
⚠️Follow all steps in order. Do not skip steps.
▪Step 1 — Reduce Microbe Volume (if above MIN line)
If the microbe level is above the MIN line on the inner wall, scoop out the excess and discard it until only the MIN level remains. The MIN line must always be maintained — do not let microbes fall below it, as the stirring rod will not be able to mix them properly below this threshold.
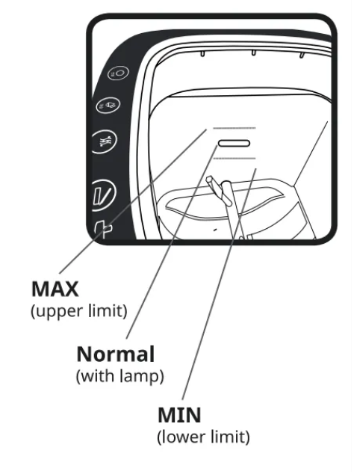
🔸MIN line location: Located just below the LED indicator light on the inner wall. The MAX line is just above the LED.
💡 If microbes are already at or below the MIN line, do not remove any — skip to Step 2. |
▪Step 2 — Remove Surface Moisture
If there is visible moisture or oil pooling on the surface of the microbes, use unbleached paper towels or grease-absorbing paper to blot and absorb it. Press gently onto the surface and remove.
❗ Important: This is not a one-time step. Repeat this process frequently throughout the recovery period. The stirring rod continuously turns the microbes, which brings wet material from the bottom back to the surface. Regular blotting significantly speeds up recovery. |
▪Step 3 — Stop All Food Input
Stop adding food completely until the microbes return to a healthy, moist-but-not-wet soil state.
⚠ ❌ Do not add any food — until moisture has visibly improved.
Wetness Level | Estimated Recovery Time |
Slightly clumped | 5–7 days |
Wet and clumpy | 1–2 weeks |
Liquid pooling on surface | 2 weeks or more |
Fully liquified | Not recoverable — replace microbes |
▪Step 4 — Use Dry Mode (Supplementary)
Press the Dry button to activate drying mode. This runs for 24 hours automatically, raising the internal temperature slightly and increasing fan speed to promote evaporation. This is a supplementary measure — it supports recovery but is not sufficient on its own. Continue blotting the surface (Step 2) alongside Dry mode for best results.

▪Step 5 — Resume Feeding Gradually
Once the microbes have returned to a healthy moist-soil state (confirmed by the Squeeze Test), resume feeding gradually:
Start with 300g of easy foods (bread, crackers)
Increase to 500g after 1–2 days if microbes are processing well
Return to normal capacity (700g–1kg for Prime, 1kg–1.5kg for Gravity/Gravity Pro) gradually over 1–2 weeks
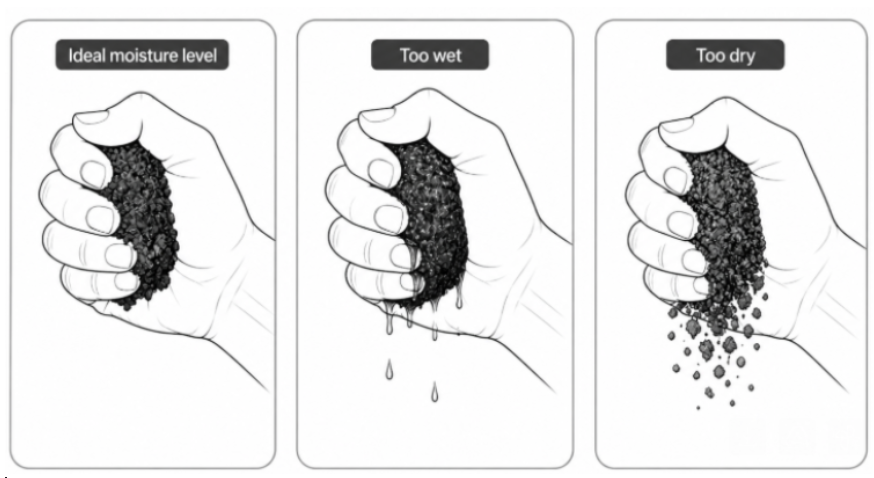
◻How to check moisture levels: the Squeeze Test